SingaporeMotherhood | Parenting
December 2014
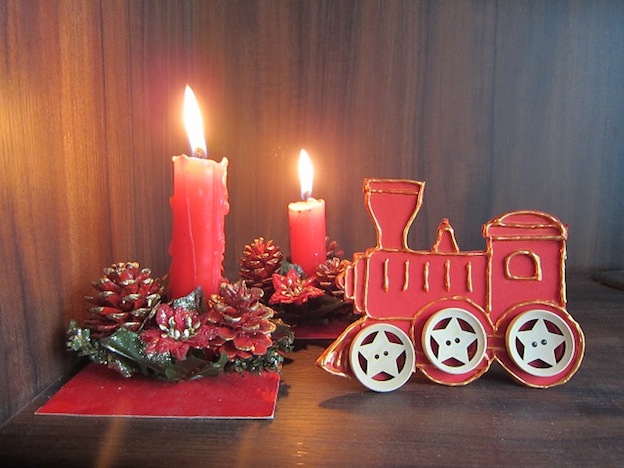
DIY: “Rolling Good Times” Train Photo Frame

2014, with all its high and low points, is drawing to a close. What were some memorable events that had taken place for you and your child this year? Perhaps it was a new addition to the family, your child’s first concert performance or a long-awaited family holiday abroad?
Author Robert Brault once advised: “Enjoy the little things, for one day you may look back and realise they were the big things.” So often we whiz through life without pausing to enjoy the little moments which make it memorable. To help your child form a habit of reflecting, why not look through some of this year’s photographs with her? Pause to reminisce these good times, laugh over the funny moments and re-live those little milestones which she can be proud of. After which, select several photographs representing the highlights of the year, make some photo frames and display them. You will find that there’s much to be thankful for, and you’ll probably end up with more photos than you can display!
[banner][/banner]
Making the Photo Frame
Materials required:
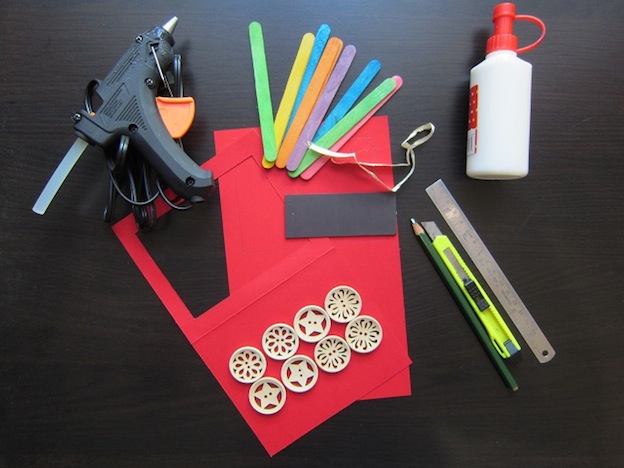
Depending on the design of your train engine and number of carriages you are making, the number of buttons and ice-cream sticks may vary. For the design used in this project, the materials used are as follows:
– 3 sheets of stiff cardboard (220 gsm or heavier)
– 7 Large buttons (available from shops which sell scrapbooking accessories)
– Glue gun
– White glue
– Glue stick
– 9 Coloured ice-cream sticks
Optional materials:
– Rubber magnet strip (available at Daiso)
– Ribbon
Step 1:
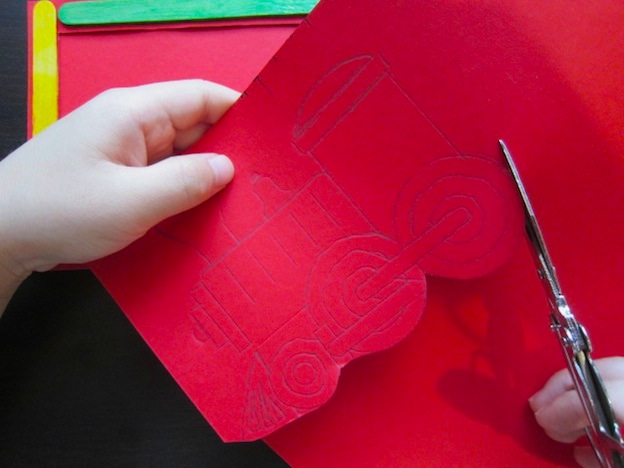
Select a train engine of your choice from free clipart available online. Print it on normal A4 paper (cardboard is too stiff to go through the printer), trace it onto a piece of stiff cardboard and then cut it out (you may need to paste two pieces of cardboard together to stiffen it). Try to make the height of the engine around 9.5 cm so that it will look proportional to the train carriages.
You can choose to draw only the silhouette of the engine, highlight just a few lines using puffy fabric paint or glitter glue, or get your child to colour the printed picture before pasting the engine picture onto stiff cardboard. Puffy fabric paint was used to outline the engine in this project.
Step 2:
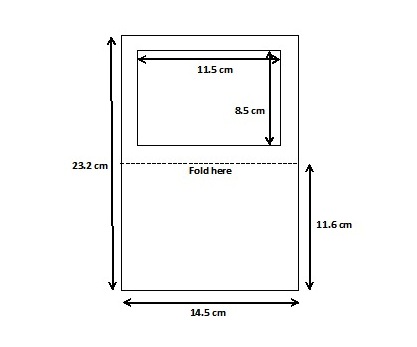
To make the train carriage photo frames, cut two pieces of cardboard according to the dimensions shown, and fold along the dotted lines. Save the two rectangular pieces that were cut out from the frame to make the stand of the photo frames.
The dimensions used in this project are selected to minimise cutting of the ice-cream sticks as the splinters can be sharp. The photo frames made using these dimensions will fit a 3R-sized photo.
Step 3:
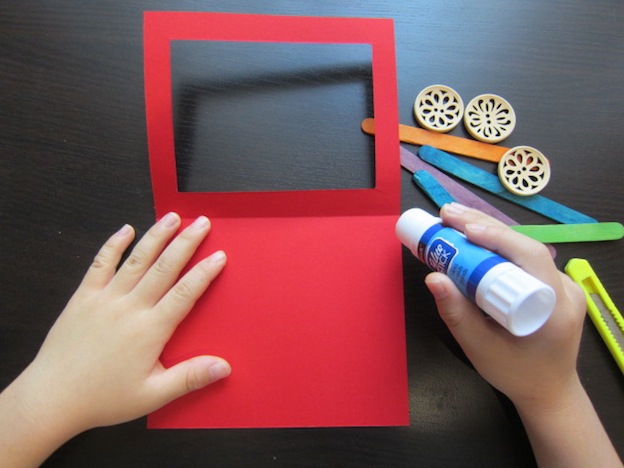
Unfold the photo frame and glue the ice-cream sticks to the boarder of the frame using white craft glue. It is important for the photo frame to be unfolded at this stage as any leakage from the white glue may stick the front and back of the photo frame together. Objects such as pasta, coloured straws, stickers or seashells may be used to decorate the boarder in place of ice-cream sticks.
After the white glue is dry, place the side with ice-cream sticks facing down. Using a glue stick, apply a 0.5cm strip of glue to the longer edges of the cardboard, fold back the cardboard in half and press the edges firmly. Ensure that the strip of glue is not too thick, otherwise the photograph will not be able to fit the frame.
Step 4:
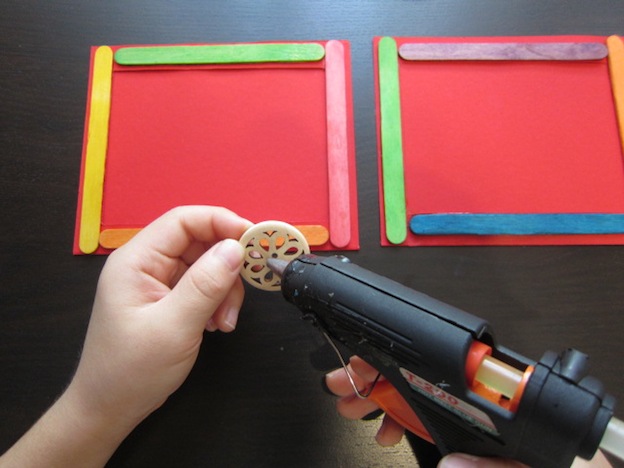
Using a glue gun, apply some glue to the centre of a button and paste it on the base of the photo frame to form the wheels of the train carriage.
Step 5:

Fold the rectangle for the photo frame stand in half lengthwise and glue it together to stiffen it. Fold down the top 2 cm of the stand, align the base of the stand with the base of the photo frame, and glue it to the back of the carriage. Repeat this procedure for the other carriage.
Cut a shorter rectangular piece and repeat the procedure for the train engine. The length of this rectangular piece will depend on your selected engine design.
If you prefer to make fridge magnets instead, paste magnetic strips on the back of your photo frames in place of the photo frame stands.
Alternatively, you can make multiple carriages, attach a ribbon to the back of each carriage, and use them to decorate your Christmas tree. Place the engine at the top of the tree, followed by carriages winding up the tree. In this way, you can display more photos, and recycle the frames for next year’s memories.
Step 6:
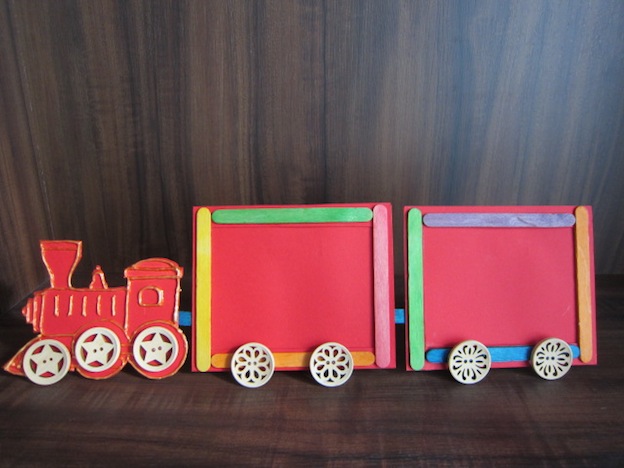
Place the engine and carriages face down and align them such that their wheels are in a straight line. Cut the remaining ice-cream stick in half and attach it using a glue gun to the back of the carriages and engine to join them up (see image in step 5, above). Now insert your favourite photos into the frames and let the good times roll!
All content from this article, including images, cannot be reproduced without credits or written permission from SingaporeMotherhood.
Follow us on Facebook, Instagram, Telegram, and TikTok for the latest article and promotion updates.