SingaporeMotherhood | Family Fun
April 2020
Earth Day 2020: Upcycled Craft Ideas for #stayhome Fun
It is Earth Day today, Wednesday 22 April, and while you and the kids are in #stayhome mode, there’s lots you can do to celebrate this planet we call home. Specifically, we’re talking about upcycling projects that kids can do with what you already have at home. What’s more, this is a fab way to introduce them to the importance of reusing and repurposing, and to encourage them to let their imaginations run wild. We love these from our super creative local mummy bloggers (and more), and hope you will too!
[banner]
(See also: 5 Ways to Live a Zero-Waste Life in Singapore now)
Crafts with Toilet paper Rolls
Every home always has an abundance of toilet paper rolls, and even more so now! Toilet rolls are actually a great material for DIY crafting, hence are a good staple for your crafting tool kit.
Photo frame (from Pei Pei Hao Hao)
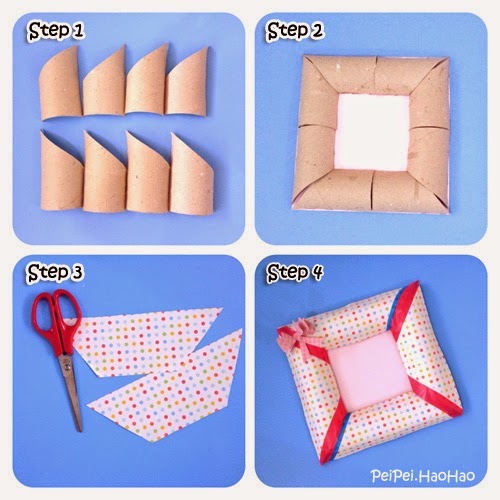
We all have photos we’d love to get framed, but sometimes we just can’t find time to buy the frames! Why not take this opportunity to make a unique frame for some of your favourite family photos and save the numerous toilet rolls we have in the process?
Materials:
- 4 Toilet roll cardboards
- Coloured or white paper
- Cardboard or hard paper backing from the back of a drawing block or foolscap paper deck
- Masking tape and double-sided tape
- Glue
- Ruler
- Scissors or pen knife
- Optional: Washi tapes, sticker ribbon, and OHP transparency film
- Optional: Glitter, crayons, markers and paint, for extra decoration!
Steps:
- Decide how big you want your frame to be, measure that out on the cardboard and cut it out
- Laying the toilet rolls flat on their side, cut lengthwise on two sides
- Cut diagonally through the corners
- Glue the edges of the toilet paper rolls onto the cardboard. This is the border of the photo frame
- Cut the paper into pieces to cover the rolls
- Measure the total size of the photo frame and cut that size out of the cardboard, then paste it to the back of your frame. This is your backing
- Optional: Insert a piece of OHP transparency as protection for your photo
Moana and Friends (from Molly Moo Crafts)
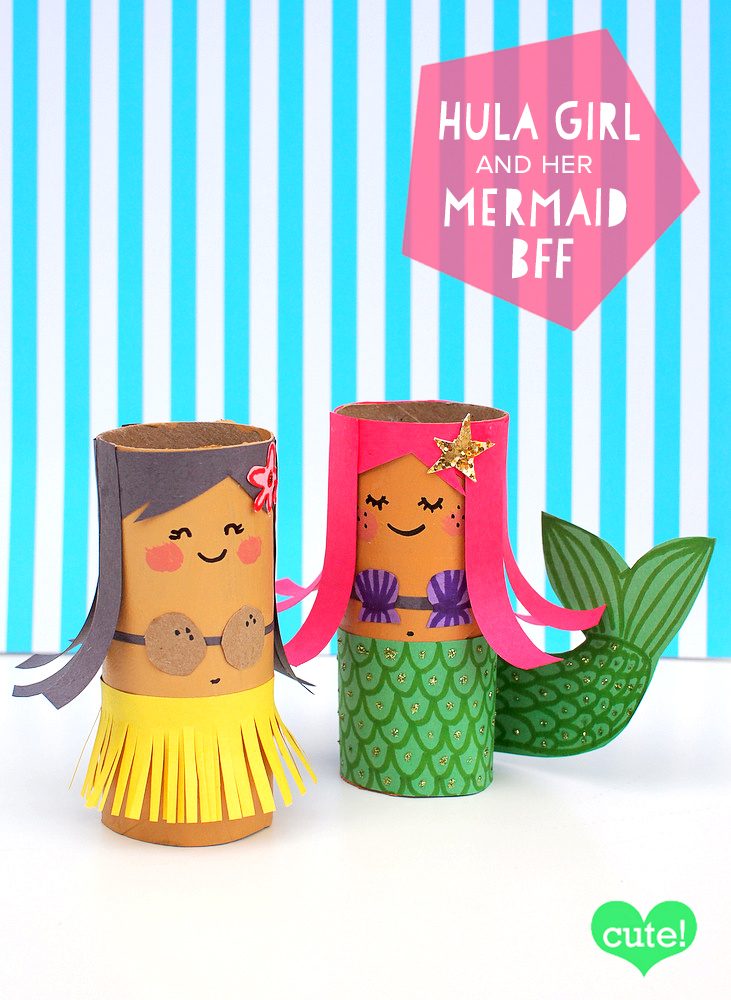
Moana and her fellow Disney Princess Ariel have captured the hearts of many little girls (and their Mums!) across the world and Singapore is no exception! This cute craft will let the little ones get creative with their decorating and dress-up skills, and maybe channel their favourite Disney Princesses.
Materials:
- Toilet roll cardboards
- Construction and coloured paper
- Glue
- Scissors
- Markers, coloured pens and glitter glue
- Painting materials
Steps:
- Paint toilet paper tubes in a preferred skin tone shade and wait to dry
- Draw on the face with the marker
- Cut out hair, top, skirt and tail bits from the coloured paper and use glitter glue and coloured pens to decorate to your heart’s content!
- Optional: For older kids or more experienced crafters, use fabric strips to cut out designs for clothes
- Use the coloured paper to also cut out hair
- Optional: Use string or rubber bands to give the hair more texture and interesting look and feel
- Optional: Use the remaining materials to cut out headpieces for hair
Crafts with cardboard
Cardboard is one of the sturdiest materials we use—don’t let it go to waste and use it as part of your DIY instead.
TV and Home Theatre (From Growing With the Tans)
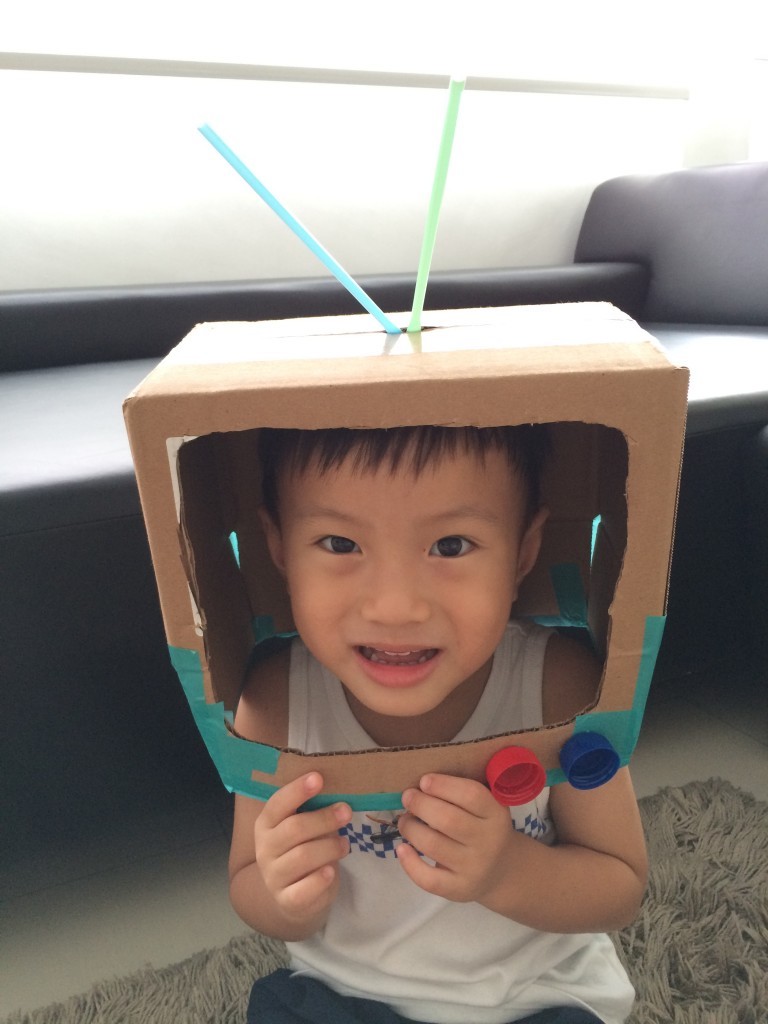
If we’re finding ourselves ordering more online and collecting more and more packaging, let’s repurpose those packaging boxes into a home theatre! A new way to tell stories and let our fantasy world into our homes!
Materials:
- Cardboard box
- Scissors or penknife
- Tape or Glue
- Straws
- Bottle caps
- Ruler
- Optional: Paint or coloured paper
Steps:
- Measure out the size of your “screen” and cut it out
- To make “antenna,” stick the straws onto the top of the box
- Stick the bottle caps to the bottom of the screen to be buttons
- Use the paint or coloured paper to decorate the exterior of your TV
Cardboard doll and cardboard clothes (From A Dollop of Me)
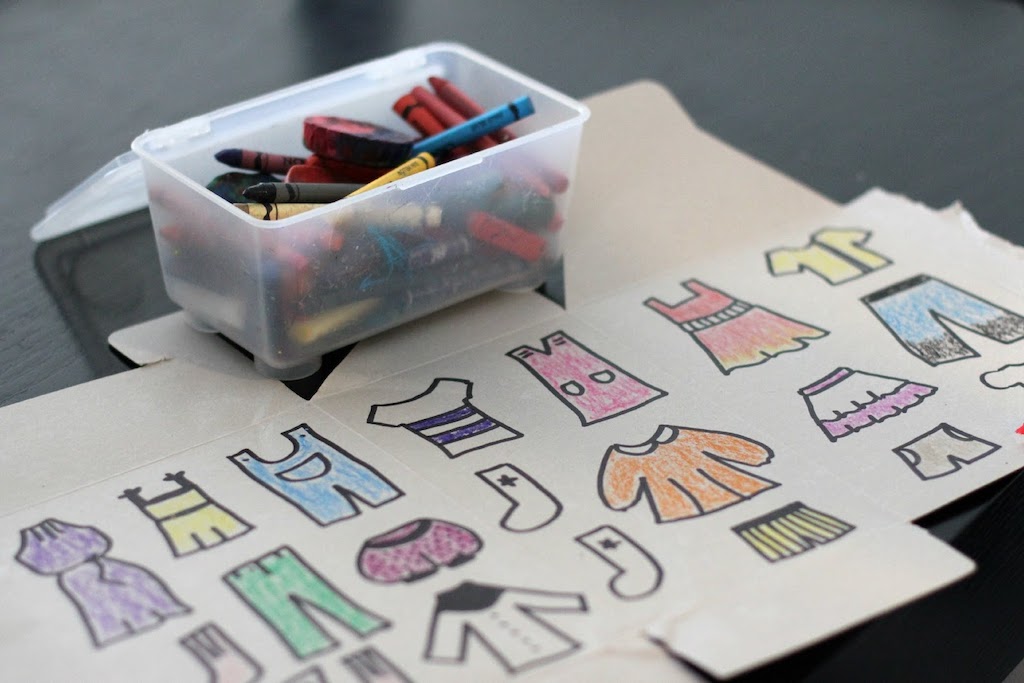
This is an easy way to create a new set of dolls without going out to the shops and buying some. Plus, kids will get a chance to create the dolls and outfits that they really love.
Materials:
- Cardboard box or cardboard
- Scissors
- Coloured paper
- Coloured pencils
- Glue
- Any other decorative items
- Marker
Steps:
- Decide what kinds of clothes and dolls you’d like to start on
- Using the marker, trace out the outlines onto the cardboard. You can also use pens or pencils, but markers make the designs easier to see on the cardboard
- Cut out the shapes
- Use coloured paper and coloured pencils to decorate the outfits and the dolls
- Optional: If you have items such as string or felt, you can use that as part of the decorations for hair and clothes as well!
Cardboard Costumes (From Life is in the Small Things)
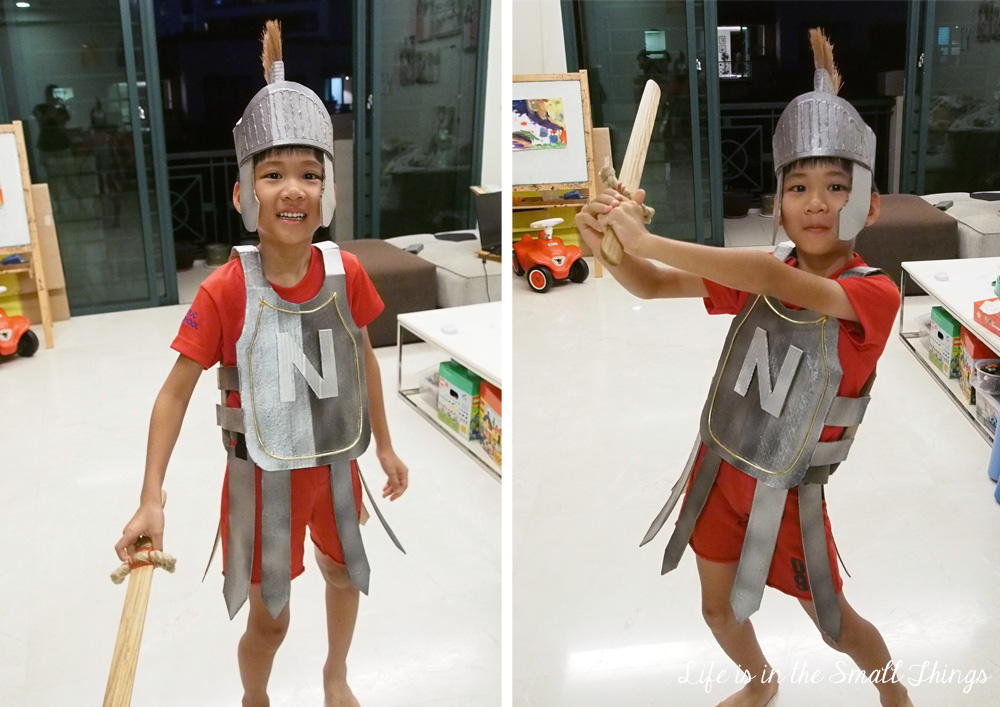
Just like the cardboard dolls, this is an imaginative opportunity for kids to make their newest Halloween or fancy-dress costume with items already existing. This saves money, Mummy’s shopping time, and creates less waste with one-off costumes too!
Materials:
- Cardboard
- Paint supplies
- Optional: Paint roller
- Glue or thick tape
- Ruler
- Marker
- Penknife
Steps:
- Using the marker and ruler, draw out the designs for your suit of armour or costume
- Using the penknife and adult supervision, cut out the designs from the cardboard
- To reinforce the sides if needed, fold the edges inside and glue the sides together
- Paint over the cardboard. Its optional to use a paint roller, depending on the type of paint and surface area
Crafts with egg cartons
Eggs are a necessity at home as they are nutritious and delicious, and kids run through eggs so quickly! If you have egg cartons at home, reuse them to make fun crafts!
Egg Carton Animals (From A Happy Mum)
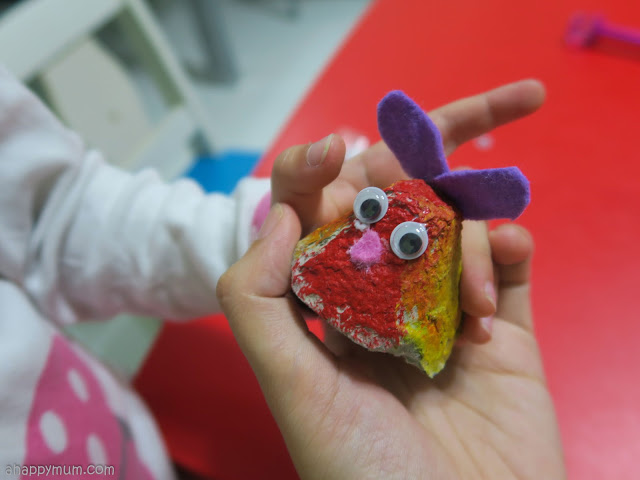
Since we can’t go to the zoo, let’s bring the zoo to us. A great way to get kids talking about animal conservation while doing some fun activities.
Materials:
- Egg carton
- Painting supplies
- Glue or double-sided tape
- Scissors
- Marker, glitter glue
- Coloured paper and old magazine paper
- Optional: Pipe cleaner, rubber bands, strings and googly eyes
- Optional: Decorative paper, foam paper, felt or fabric
Steps:
- After deciding on what animal you’d like, cut out the egg carton individually and paint it with a base colour
- After paint is dry, draw eyes or use the googly eyes. Use the coloured paper or magazine paper for the features of the animal, or use felt or fabric instead
- Glue or tape the materials in place
- Use the materials to cut out the rest of the body such as wings or feet. For a different feel, use pipe cleaner, rubber bands or string!
Crafts with plastic
Plastic is always around us, and we often have an abundance sitting around in our homes. Here are some ideas on how to reuse plastic bottles!
Recycled Bottle Bowling (From Little Green Dot and U Create Crafts)
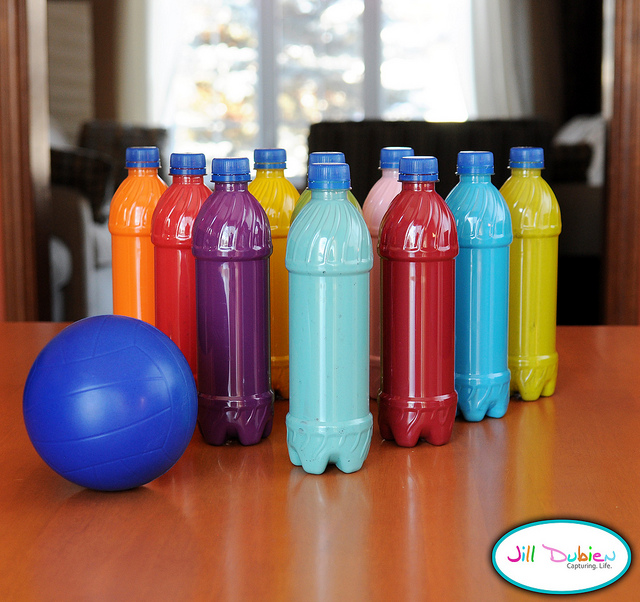
If we can’t go to the bowling alley, why not bring the bowling alley to us?
Materials:
- 5 to 10 plastic bottles, preferably of the same or similar size
- Paint (can be the same or different colours)
- Access to water
- A ball
- Optional: beans/beads or rice for fillings
Steps:
- Clean the bottles thoroughly
- Fill the bottles with just a little bit of paint
- To get colour all over the bottle, add a little bit of water to dilute the paint. If your paint is thin, don’t add too much water as it won’t be enough to cover the bottle properly
- Shake vigorously to cover the inside of the bottle
- Optional: Get your painting supplies out and instead of coating the bottle with paint from the instead, paint the outside of the bottles
- Optional: Use beans/beads/rice for fillings to make the bottles heavier and harder to fall
- Put the caps back on and if there are fillings, seal with glue or tape
- Get a ball, line the pins up, and bowl away
Treasure Chest (From Positive Lee Peilin)
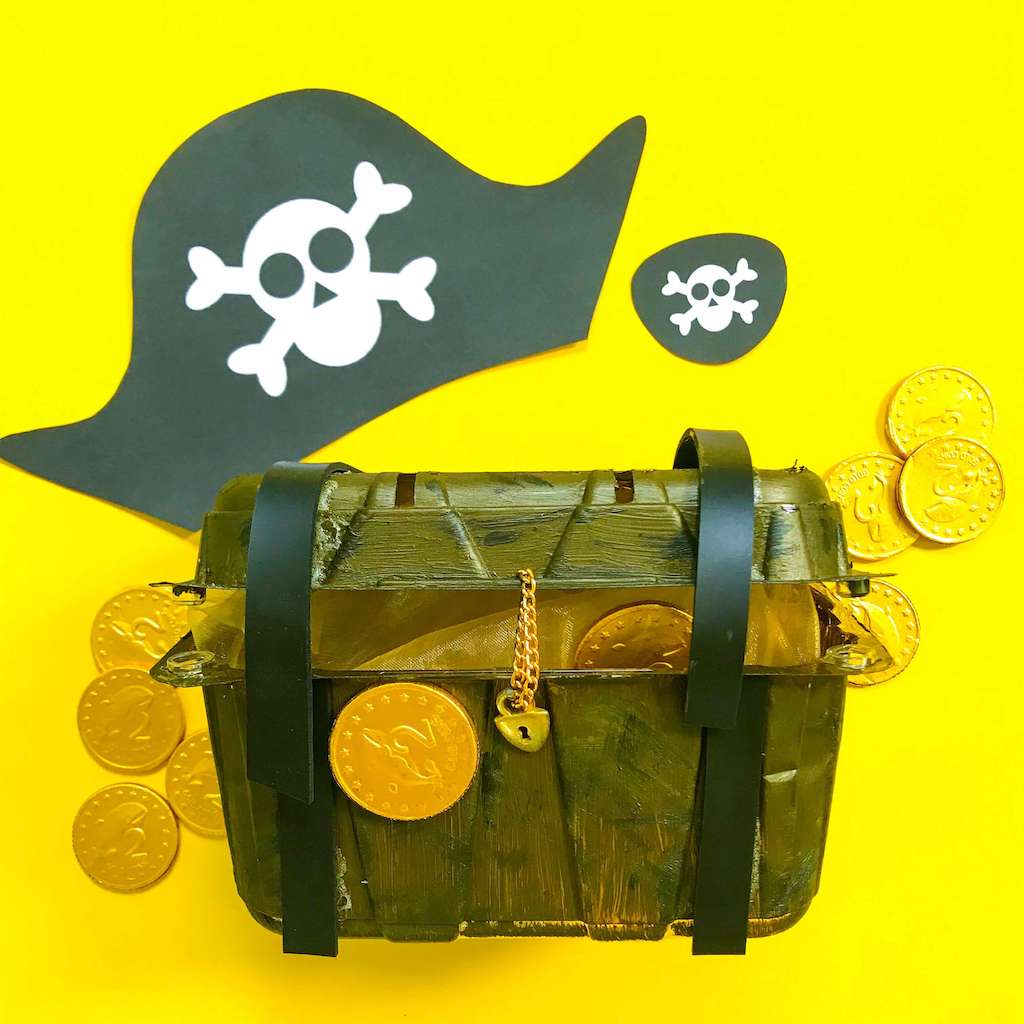
If you were planning on making a trip to Disneyland over the next few holidays but are now unable to, don’t fret— bring the pirate’s life to your doorstep instead! This is also a good way to reuse plastic containers that you might have collected from buying fruit or vegetables, and can also be made into a piggy-bank to help get kids started on saving!
Materials:
- Plastic fruit box
- Paint supplies
- Access to water
- Penknife or scissors
- Glue or tape
- Gold paper or stickers
- Cardboard or thicker paper
- Optional: Faux leather strips, fabric strips and a gold key and key chain
Steps:
- Wash and dry the container
- Paint your container to the colour you like (we recommend brown to mimic a treasure chest, but you can colour it anything you want)
- Once dry, decorate with gold paper or stickers to give it the effect of a treasure chest
- Optional: if making a piggy-bank, cut a small opening into the middle of the lid for coins using the penknife
- Optional: Use the faux leather strips to decorate the lid or black paper
- Cut a piece of cardboard and glue it to the bottom of the box for more structure
- Optional: Take the gold key and keychain and paste it at the front of the box to give it a more authentic pirate look
Decorative Pots (From Lil Blue Bottle)
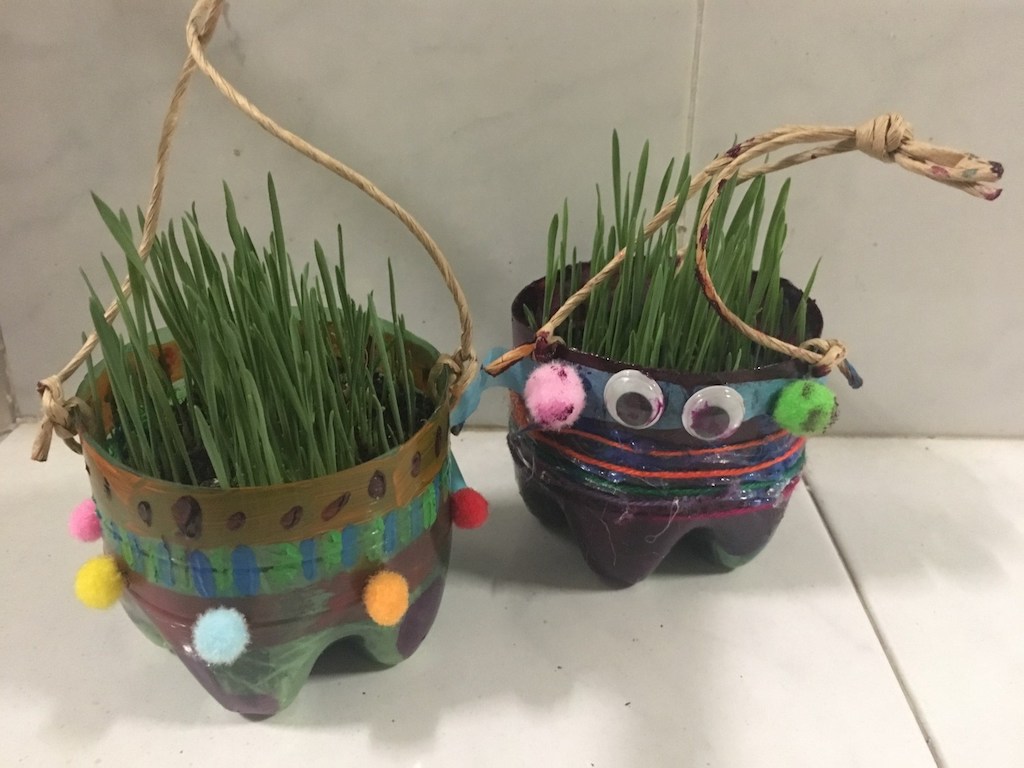
An adorable way to create your ideal pot for the plants in your family. Use it as a new piece of household decoration by repotting small plants into them.
Materials:
- Plastic bottle (50-100mL)
- Scissors
- Penknife
- Soil, rocks or beans or rice
- Optional: Twine or rope
- Optional: Hole puncher
- Optional: Paint
Steps:
- Using the penknife or scissors, cut the bottle in half
- Use only the bottom part of the bottle. This will be your pot
- Optional: Paint the pot to your heart’s desire
- Optional: using the hole puncher, punch out two holes on two sides of the pot
- Optional: Thread the twine or rope through the holes so the pot can be put on a higher surface
- Using soil, rocks beans or rice as a base, use it to fill around 1/3
Crafts with fabrics, glass and other used materials!
If you’ve been doing a bout of (delayed) spring cleaning, you might have some bits and bobs lying around that you can also incorporate into cute crafts!
Tuna Tins as Home Décor (From Giant Sg via Kifli es levendula)
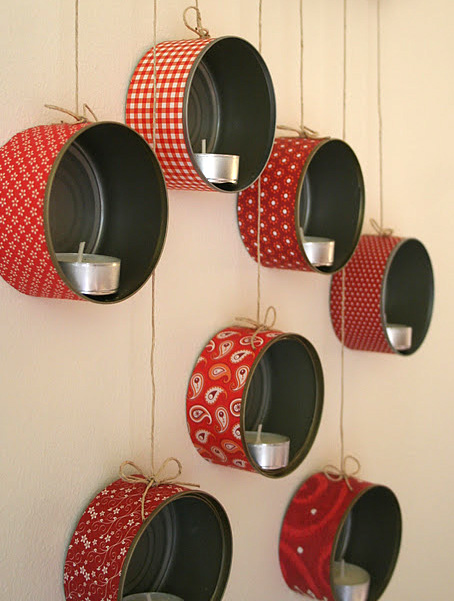
If you’re one someone who’s stocked up on canned foods and also getting bored of your current home décor, here’s a fun way to get the whole family involved in decorating, while also saving an online shop and a post-Circuit Breaker trip to Ikea.
Materials:
- Tuna tins (or other aluminium food tins, as long as they are shorter and flat)
- Wrapping paper or decorative paper
- Glue or tape
- Twine, Velcro mounting tape or string
- Optional: Tealights
Steps:
- Wrap the tins with the decorative or wrapping paper
- Put the tin on its side—the base of the tin should be facing you
- Optional: If using tealights, make sure to secure the tealights to the sides of the tin, not the base
- You can also affix other pieces of decoration like family photos, quotes or mementos into the tuna cans using glue or double sided tape
- If using twine or string, tie it around the can and knot it at the top. Leave excess twine for hanging, depending on how long and where you want to hang it from
- If using Velcro mounting tape, stick one piece to the back of the can and the other to the wall
Glove Puppets (From iSwitch)
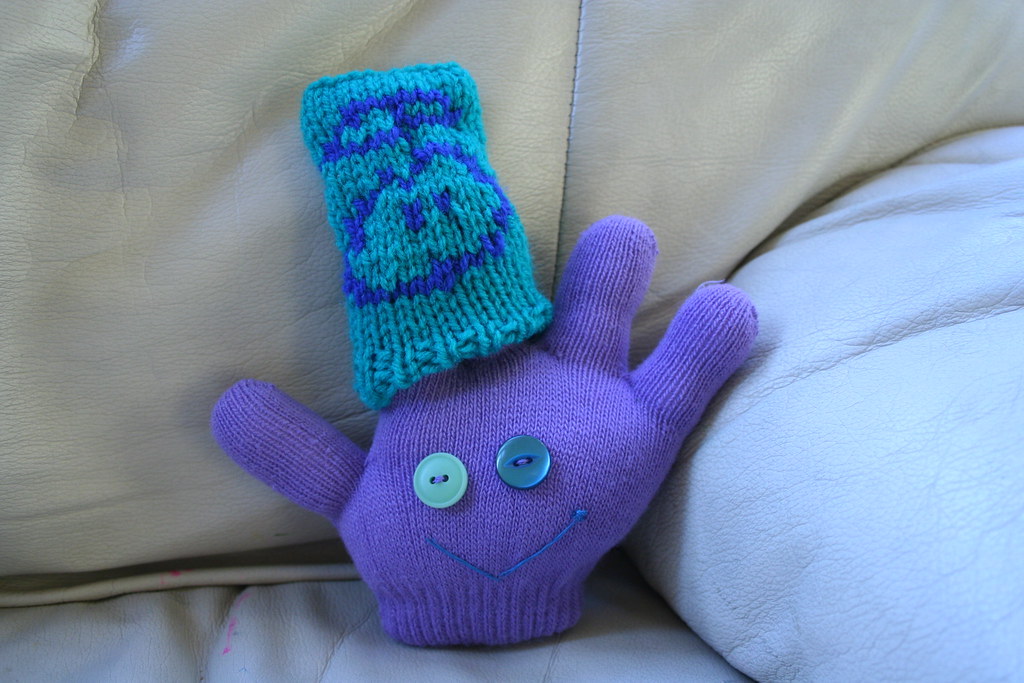
Singaporeans love to travel, especially going to winter countries. Unfortunately, winter trips won’t be happening for a while, and that can mean some of our winter clothes might be going to waste. Why not turn a pair of gloves into glove puppets, let kids embark on a small sewing project, and tell a story that delights the whole family?
Materials:
- Cotton gloves
- Sewing materials
- Buttons or Googly eyes
- Fabric
Steps:
- Using the sewing materials, sew the buttons or googly eyes onto the palm part of the gloves to make eyes
- If you want, use fabric and your sewing skills to decorate the rest of the gloves
- Kids can try to sew their name or that of their favourite character for a challenge!
Bottle Vase (from BPDG Travels)
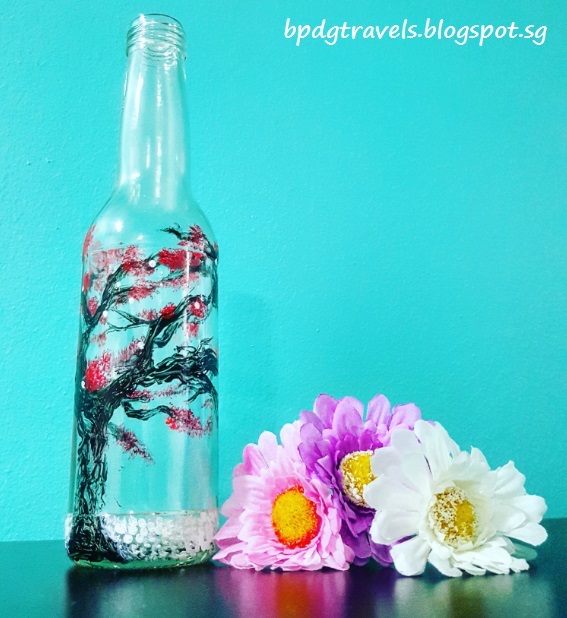
If you have fancy glass bottles lying around and you’re not sure what to do with them, they’re a great way to add decoration around your home. Plus, in case you were thinking of giving it as a thoughtful gift, the glass gives an elegant and polished effect to your upcycled DIY project!
Materials:
- Empty glass bottle
- Painting supplies
- Optional: Washi tape, decorative paper, magazine paper or spray paint
- Optional: rocks, sand beans or rice
- Optional: stencil
Steps:
- Wash and dry the glass bottle
- Use your stencil to trace out a design you like, or just use free hand
- Optional: fill the bottom of the glass with a base such as rock or sand
CD Animal Card
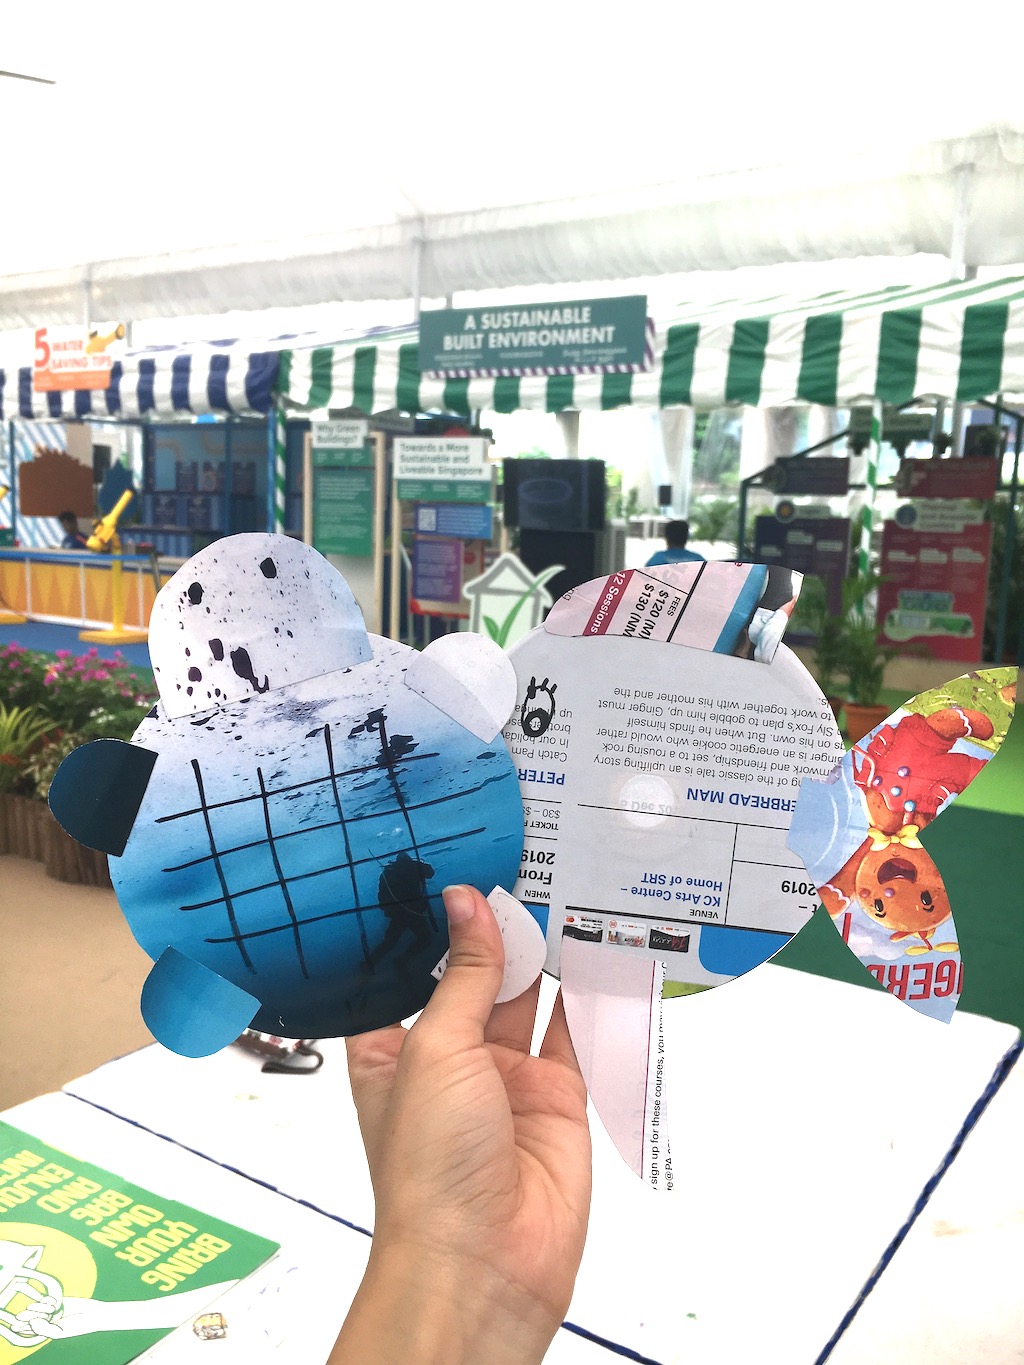
A stylish, nature themed, home-made card, while not letting those old magazines, CDs and cardboard go to waste!
Materials:
- Cardboard or foolscap or drawing block backing
- Old CDs
- Marker
- Old magazine pages
- Scissors
- Glue
Steps:
- On the cardboard, trace out the outlines for the body of animal of your choice. We suggest using templates like this one as an idea. This will provide reinforcement to the body
- Cut out the template pieces from the cardboard
- Cut out the magazine paper to align with the animal parts and paste over the cardboard
- To cover up the part of the CD with the design, use the old magazine pages and trace a circle around it, then cut it out and paste over. The blank side should remain untouched
- Paste the animal parts onto the edges of the CD to create the animal
- With a marker, use the blank side to write your message!
Happy Earth Day 2020 crafting!
And there you have it, 13 fun crafts that can be done with all age groups and for all levels of DIY-ers. We hope this gets your creative inspiration going, and helps add a few hours’ worth of fun activity during Earth Day 2020 this Circuit Breaker period!
Header and Featured images: National Cancer Institute on Unsplash
All content from this article, including images, cannot be reproduced without credits or written permission from SingaporeMotherhood.
Follow us on Facebook, Instagram, and Telegram for the latest article and promotion updates.